Installing Chunky
To install Chunky, download the Chunky Launcher (Universal JAR).1 This requires the installation of Java 17 and OpenJFX. Download links and setup instructions are located below.
Requirements
| CPU | Available RAM | Available Storage | |
|---|---|---|---|
| Minimum requirements2 | CPU supported by Java & OpenJFX | 512 MB | 270 MB for core files:
|
| Recommended requirements | 64-bit CPU | 8+ GB | 270 MB for core files +
|
Downloads
Chunky Launcher v1.14.0
OpenJFX
Setup
-
Step 1: Download the Java 17 JRE for your platform.3
-
Step 2: Download the Chunky Launcher (Universal JAR) and save it to a safe place on your computer (you will use this to start Chunky).
Further setup instructions for Windows, Linux, and macOS are located below.
Windows
-
Step 3: If you downloaded the Java 17 installer, then run it to install Java 17 on your computer. If you downloaded the Java 17 ZIP archive, then extract it to a safe place on your computer.
-
Step 4: Start the "ChunkyLauncher.jar". This can usually be done by double-clicking it, although you may need to start it via a command line or script using the command,
java -jar "<path\to\ChunkyLauncher.jar>" --launcher.5 6 This is required if you downloaded the Java 17 ZIP archive, unless you manually properly set JAR files to open with Java 17, in which case you can start the Chunky Launcher by double-clicking it. If JAR files are not properly set to open with Java 17, then the command to start it is,"<path\to\Java 17\java.exe>" -jar "<path\to\ChunkyLauncher.jar>" --launcher.5 6
Linux
-
Step 3: Install Java 17 on your computer.
-
Step 4: Start the "ChunkyLauncher.jar" with the command,
'</path/to/Java 17/java>' -jar '</path/to/ChunkyLauncher.jar>' --launcher.5 6
macOS
On M1-equipped macs, which are aarch64 (ARM-based), Rosetta 2 enables an emulation, of sorts, of x64 macOS applications. Please ensure that both the JRE and OpenJFX have matching architectures. We recommended native aarch64, although x64 performance should be similar.
-
Step 3: Install or extract Java 17 on your computer.
-
Step 4: Start the "ChunkyLauncher.jar" with the command,
"</path/to/java 17/java>" -jar "</path/to/ChunkyLauncher.jar>" --launcher.5 6
Install JavaFX
Chunky requires JavaFX to be installed to funtion in GUI mode. JavaFX is not required for headless operation of Chunky. The Chunky Launcher will attempt to detect the location to which JavaFX is installed to whenever it is started normally. If it cannot detect JavaFX, the 'Install JavaFX' window will open.
Figure 1: 'Install JavaFX' Window
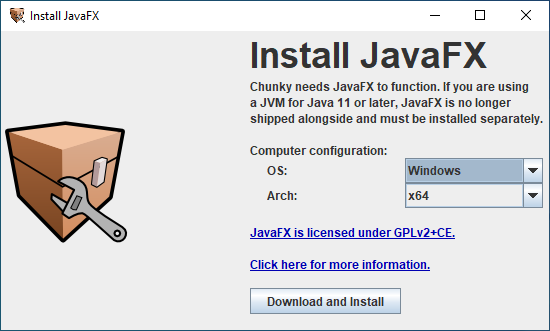
The Launcher will attempt to set the computer configuration options automatically, but they can be set manually if the values are incorrect. Once the computer configuration options have been set to match the configuration of your computer, click Download and Install.
Chunky First-Time Setup
The first time you start the Chunky Launcher, you will be asked to pick a settings directory for Chunky:
Figure 2: 'Chunky First-Time Setup' Window
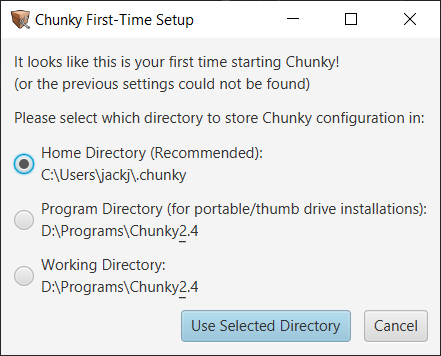
The recommended directory is usually the best option. Click Use Selected Directory to continue. You will see the main Chunky Launcher window next.
Manual Setup
If you encountered issues with the normal setup, or if you desire to use a custom setup, then follow these instructions.
-
Step 1: Download the Java 17 JRE for your platform.3
-
Step 2: Download the OpenJFX 17.0.2 SDK for your platform.3 4 OpenJFX is not required to run Chunky headlessly (via command line).
-
Step 3: Download the Chunky Launcher (Universal JAR) and save it to a safe place on your computer (you will use this to start Chunky).
Further setup instructions for Windows, Linux, and macOS are located below.
Windows
-
Step 4: If you downloaded the Java 17 installer, then run it to install Java 17 on your computer. If you downloaded the Java 17 ZIP archive, then extract it to a safe place on your computer.
-
Step 5: Extract from the OpenJFX ZIP archive the "bin", "legal", and "lib" folders to a location on your computer. "C:\Program Files\openjfx" and "C:\Users\<username>\.chunky\javafx" are default installation locations that the Chunky Launcher can detect automatically. Take note of the path of the folder to which you extracted the folders.
-
Step 6: Start the "ChunkyLauncher.jar" with the command,
"<path\to\Java 17\java.exe>" --module-path <path\to\javafx\lib> --add-modules javafx.controls,javafx.fxml -jar "<path\to\ChunkyLauncher.jar>" --launcher.5 6
Linux
-
Step 4: Install Java 17 on your computer.
-
Step 5: Extract from the OpenJFX ZIP archive the "legal" and "lib" folders to a location on your computer. "/usr/share/openjfx" and "/home/<username>/.chunky/javafx" are default installation locations that the Chunky Launcher can detect automatically. Take note of the path of the folder to which you extracted the folders.
-
Step 6: Start the "ChunkyLauncher.jar" with the command,
'</path/to/Java 17/java>' --module-path '</path/to/javafx/lib>' --add-modules javafx.controls,javafx.fxml -jar '</path/to/ChunkyLauncher.jar>' --launcher.5 6
macOS
On M1-equipped macs, which are aarch64 (ARM-based), Rosetta 2 enables an emulation, of sorts, of x64 macOS applications. Please ensure that both the JRE and OpenJFX have matching architectures. We recommended native aarch64, although x64 performance should be similar.
-
Step 4: Install or extract Java 17 on your computer.
-
Step 5: Extract from the OpenJFX ZIP archive the "legal" and "lib" folders to a location on your computer. Take note of the path of the folder to which you extracted the folders.
-
Step 6: Start the "ChunkyLauncher.jar" with the command,
"</path/to/java 17/java>" --module-path "</path/to/javafx/lib>" --add-modules javafx.controls,javafx.fxml -jar "</path/to/ChunkyLauncher.jar>" --launcher.5 6
Troubleshooting
If you get an unchecked exception caused by java.lang.NoClassDefFoundError: javafx/stage/Stage when starting the Chunky Launcher, then, if using Windows, verify that OpenJFX is installed to either "C:\Program Files\openjfx" or "C:\Users\<username>\.chunky\javafx".6 If the error persists, or if OpenJFX is purposely installed to another directory, then use the following command to start the Chunky Launcher: java --module-path "<path\to\javafx\lib>" --add-modules javafx.controls,javafx.fxml -jar "<path\to\ChunkyLauncher.jar>" --launcher.5 6
-
Installers for Windows, Linux and macOS are planned. ↩
-
The bare minimum to run Chunky is Java 8 update 60 (which includes OpenJFX), 512MB of allocated RAM, and 270 MB of storage for core files. ↩
-
Ensure that the OS and Architecture correctly match your system. ↩↩↩
-
We have not tested OpenJFX 19 at this time, but it is assumed that it will work. ↩
-
It is important that quotation marks
" "be included around any file paths to ensure that special characters like hyphens-, spaces, etc., do not cause issues. ↩↩↩↩↩↩↩↩ -
Replace text within angle brackets
< >with the actual paths to the files on your computer, and do not include the angle brackets in the actual command or input. ↩↩↩↩↩↩↩↩↩