Skymaps
A custom sky can be used in Chunky through the use of a skymap, which is an image file that is projected in the right way to cover a sphere or a half-sphere. A skymap can be set using the Sky mode dropdown menu in the Sky & Fog tab.
Chunky supports three main types of skymaps. These are equirectangular skymaps, angular skymaps, and skyboxes / skycubes. It is recommended to use a high-resolution image as a skymap, since it must be placed onto the entire sky. However, a skymap with a resolution that is too great will take much time to load and use much RAM. Chunky supports PNG, JPG, HDR, and PFM image files as skymaps.
Equirectangular Skymaps
An equirectangular skymap is a skymap format that uses the equirectangular projection. One can be used by setting the Sky mode to Skymap (equirectangular).
Two types of equirectangular skymaps exist. Both types have a horizontal field of view of 360 degrees, but differ in the vertical field of view. One type has a vertical field of view of 180 degrees, and an aspect ratio of 2:1, while the other type has a vertical field of view of 90 degrees, and an aspect ratio of 4:1. A skymap with a vertical field of view of 180 degrees maps the whole sphere, while a skymap with a vertical field of view of 90 degrees maps only the space above the horizon.
Figure 1: Different equirectangular skymap types
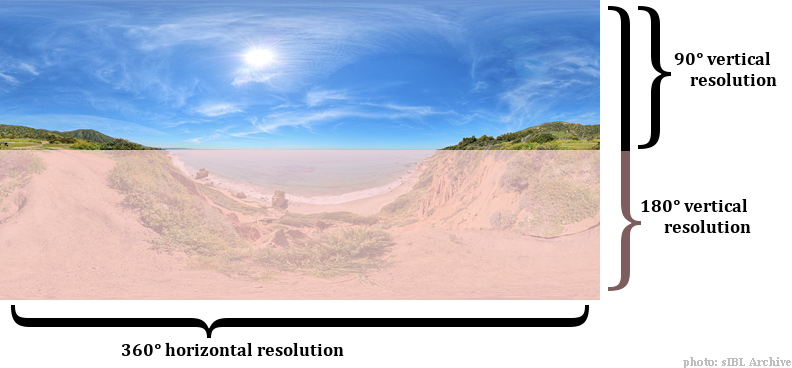
To use a skymap with a vertical field of view of 90 degrees, set the Vertical resolution in the Sky mode settings collapsible panel to Half (mirrored). To use a skymap with a vertical field of view of 180 degrees, set the Vertical resolution to Full.
Angular Skymaps
An angular skymap, also known as a light probe, is a skymap format that uses the angular fisheye projection. One can be used by setting the Sky mode to Skymap (angular).
Figure 2: Angular (light probe) skymap

Skyboxes / Skycubes
A skybox / skycube is a skymap that is composed of six separate images that cover the six faces of a virtual cube that surrounds the scene. Each component image has an aspect ratio of 1:1 and a field of view of 90 degrees in both dimensions. While several single-image skybox formats exist, Chunky supports skyboxes in which the component images are separate files. A skybox can be used by setting the Sky mode to Skybox.
HDRi Skymaps
An HDRi skymap is a skymap that uses an HDR image format, such as HDR or PFM. Such image formats use a greater number of bits to store color information per color channel, which allows for increased color precision, and more realistic lighting.
Obtaining Skymaps
There are a number of websites that provide skymaps. Often, a skymap must be purchased to download it in full resolution and to use it commercially; however, lower-resolution free samples which can be used non-commercially are often also available.
Links to additional skymaps are below.
Skymaps can also be found in the #skymaps channel of the Chunky Discord server.
Rendering a Skymap
Chunky can be used to render skymaps, both in equirectangular format, and in skybox format.
Equirectangular
To render an equirectangular skymap, follow the instructions below.
-
Step 1: Open the Camera tab in the left control panel.
-
Step 2: Open the Position & Orientation panel.
-
Step 3: Enter -90 into the second input field on the Orientation row, and press Enter.
-
Step 4: Set the Projection mode to Panoramic (equirectangular).
-
Step 5: Set the Field of view (zoom) to 180.
-
Step 6: Open the Scene tab in the left control panel.
-
Step 7: Set the Canvas size to a value in which the canvas Width is twice as large as the canvas Height, such as 800x400, to ensure that the horizontal field of view of the image is 360 degrees and the vertical field of view of the image is 180 degrees.
Figure 3: The Camera tab with correct values displayed
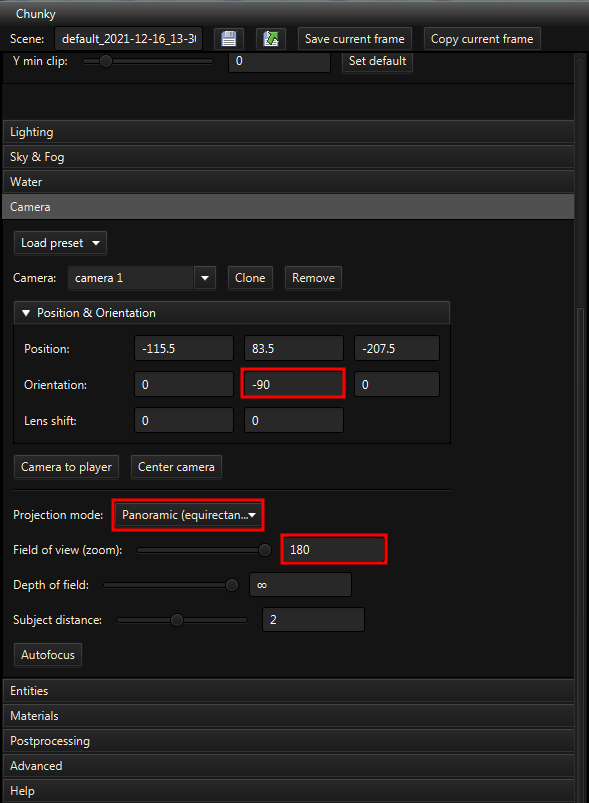
Figure 4: Example of a rendered skymap

Skybox
To render a skybox, follow the instructions below.
-
Step 1: Open the Camera tab in the left control panel.
-
Step 2: Set the Projection mode to Standard.
-
Step 3: Set the Field of view (zoom) to 90.
-
Step 4: Open the Scene tab in the left control panel.
-
Step 5: Set the Canvas size to a value in which the canvas Width is equal to the canvas Height, such as 800x800, to ensure that the field of view of the image is 90 degrees in both dimensions.
-
Step 6: Return to the Camera tab and load the preset, Skybox Right.
-
Step 7: Render the scene.
-
Step 8: Rename the saved image file to prevent Chunky from overwriting it.
-
Step 9: Repeat steps 6 through 8 for the other Skybox * presets.