Chunky Launcher GUI
The Chunky Launcher contains controls that are set before launching Chunky.
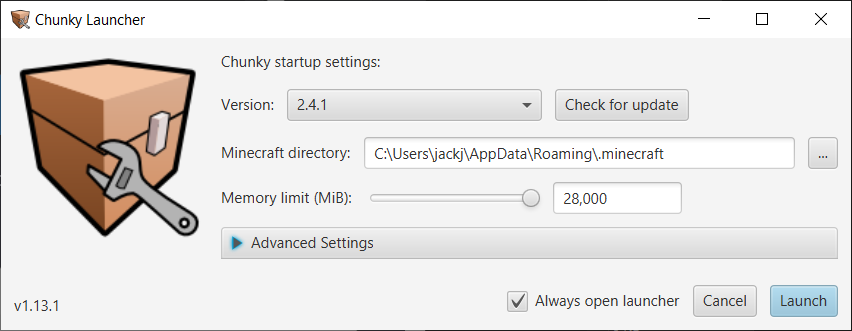
Figure 1: The Chunky Launcher
-
Version select: Drop down list which allows you to select a downloaded Chunky version to launch.
-
Check for update: Checks for updates on the chosen update site.
-
Minecraft directory: Displays the path to the directory to which Minecraft is installed. It can be changed by clicking the ... button immediately to the right of the text box.
-
Memory limit (MiB): Changes the amount of RAM that is allocated to Chunky. The default is 1024 MiB; however, it is highly recommended that you raise this value to better reflect the amount of memory in your system. Please take into account that the operating system and other applications will also require some memory, so don't over-set this. If Chunky fails to launch if this is raised past 2000 MiB, double-check that your Java installation is 64-bit.
-
Always open Launcher: Changes whether the Launcher is shown when starting Chunky. If it becomes disabled, it is possible to access the launcher again via the command line or an option in Chunky. This is slightly more complicated, however, so it is recommended to keep this option enabled.
-
Cancel: Closes the Chunky Launcher.
-
Launch: Attempts to launch the selected version of Chunky with the options set in the Launcher.
Advanced Settings
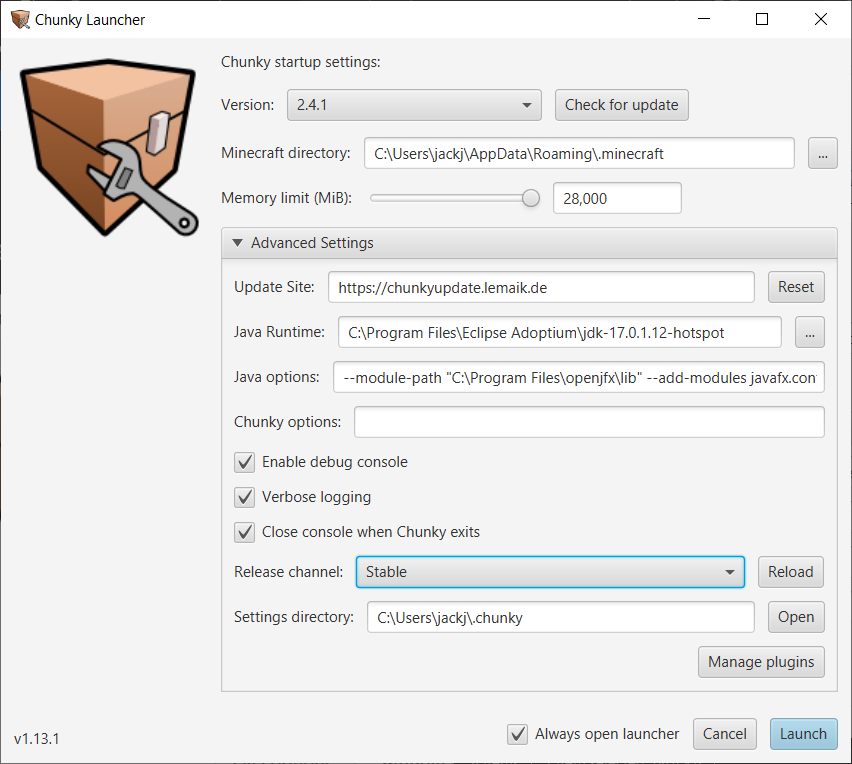
Figure 2: Chunky Launcher Advanced Settings
-
Update Site: Input field for the source of Chunky updates.
-
https://chunkyupdate.llbit.se/: This should be used to obtain Chunky 1.X, which supports worlds saved in Minecraft versions up to 1.12.2. -
https://chunkyupdate2.llbit.se/: This is for llbit's Chunky 2.0 for Minecraft 1.13. To obtain the latest version, which is "2.0beta6", you must set the Release channel to Snapshot. Otherwise, you will be stuck with an older version. -
https://chunkyupdate.lemaik.de/: This is the new default update site used to obtain Chunky 2.x. -
https://chunky-pr.lemaik.de/: This update site is used to download builds of open pull requests. Click Reload next to the Release channel dropdown menu and then set the Release Channel to PR #xxxx, with "xxxx" being the number of the open pull request. For more information, read this page.
-
-
Reset: Resets the Update Site to the default of
https://chunkyupdate.lemaik.de/. -
Java Runtime: Displays the path of the runtime used for Chunky. It can be changed by clicking the ... button immediately to the right of the text box. It does not change the runtime used for the Launcher.
-
Java options: Input field for Java options that will be set for Chunky upon launch. See below for the list of Java options.
-
Chunky options: Input field for options specific to Chunky that will be set upon launch. See below for the list of Chunky options.
-
Enable debug console: Enables the debug console, which is a separate window that opens when Chunky is launched. The debug console logs information that is useful for debugging issues with Chunky.
-
Verbose logging: Enables additional information to be logged in the debug console to further help fix issues.
-
Close console when Chunky exits: Changes whether the debug console will close when Chunky exits normally. Typically, this can be left enabled. If an exception or error causes Chunky to crash and exit abnormally, the debug console will remain open and readable.
-
Release channel: Sets the release channel used by the Launcher when checking for updates. The different release channels set the type of release that Chunky attempts to download when checking for updates.
-
Stable: Downloads stable releases of Chunky, which generally have fewer bugs than Stable Snapshot releases or Snapshot releases do.
-
Stable Snapshot: Downloads stable snapshot builds of Chunky from the chunky-2.4.x branch. Generally, these releases may contain new features, bug fixes, and potentially more bugs, but are considered more stable than Snapshot releases.
-
Snapshot: Downloads snapshot builds of Chunky from the master branch. These releases contain the latest bug fixes and new features, but potentially the most new bugs.
-
PR #xxxx: Downloads the latest build of the open pull request, "xxxx" being the number of which, if the Update site is set to
https://chunky-pr.lemaik.de/.
-
-
Settings directory: Displays the path of the Chunky settings directory.
-
Open: Opens the Chunky settings directory.
-
Manage plugins: Opens the 'Plugin Manager' dialog box, which is used to manage installed plugins.
Java options
Separate Java options from each other with a space.
-
-Dprism.order=sw: Add this if the Chunky Launcher or the Chunky window appear blank when started. This is caused by an issue with the JavaFX hardware renderer for Windows. The only known solution is to add the listed Java command/option. This may reduce responsiveness compared to-Dprism.order=hw/-Dprism.order=d3d, but those modes are limited by the maximum texture size of your GPU drivers. Add-Dprism.verbose=trueto list available pipelines in the debug console. -
-Dprism.maxvram=512M: The texture cache defaults to512M. Raising this value can allow you to render at a resolution closer to the maximum texture size allowed in hardware modes and can also help resolve issues with the software mode. You can allocate usingMorGsuffixes.1024M=1G. -
-DlogLevel=INFO:ERROR,WARNING,INFO- The default isWARNING, which will mean that Chunky will show warnings for missing items. Switching toERRORshould disable missing item warnings.
Work-in-progress PBR builds of Chunky have additional options required. These options may be added to the UI at a later time.
-
-Dchunky.pbr.specular=labpbr:labpbr,oldpbr- Tells Chunky which format the specular map is in. -
-Dchunky.pbr.updateMaterialDefaults=true: Sets default material properties toEmittance: 1,Smoothness: 1, andMetalness: 1 such that the specular map is applied to all materials. -
-Dchunky.pbr.normal=true: Enables normal mapping on certain blocks (cubes with the same texture on each face), such as planks, cobblestone, stone bricks, etc.
Chunky options
-
-tile-width <NUM>: Modifies the frame subdivision size per worker thread. Can potentially provide a boost to render speed or, if set too high, reduce render speeds. It is recommended to use a tile-width of 16 as this seems to be optimal, though you may want to test your system in a typical workload to see what works better. -
-spp-per-pass <NUM>: The spp-per-pass defines the number of samples a certain tile should be rendered to before moving on to the next tile. The default value of 1 means that each pixel will be sampled once per pass. This results in the render preview displaying the most recent render progress, and responding to changes after only one pass is rendered. Raising the spp-per-pass breaks some GUI functionality; however, rendering performance may be improved. It is recommended that this option be only used for headless operation.
Plugin Manager
The 'Plugin Manager' dialog box, shown in Figure 3, displays a list of all detected plugins, along with some management controls.
Figure 3: 'Plugin Manager' dialog box
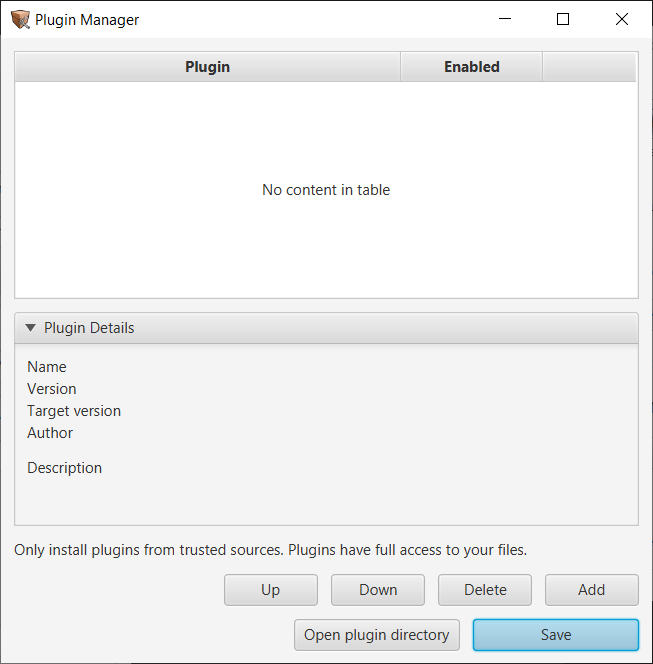
The 'Plugin manager' dialog box will display any plugins from the "plugins" directory of the Chunky settings directory. The column headers can be clicked to reorder the plugins by any listed detail. A plugin in the list can be clicked to select it. The checkbox on a plugin entry can be checked to select that plugin to be loaded when Chunky is launched.
-
Plugin Details: Collapsible panel that contains information about the selected plugin.
-
Up: Moves the selected plugin above the plugin that is immediately above it.
-
Down: Moves the selected plugin below the plugin that is immediately below it.
-
Delete: Deletes the plugin from the "plugins" directory, thereby removing it from the list.
-
Add: Opens a file explorer dialog box to browse for a JAR file to be added to the "plugins" directory.
-
Open plugin directory: Opens the "plugins" directory of the Chunky settings directory.
-
Save: Saves the new plugin configuration and closes the 'Plugin Manager' dialog box.